Spring Security –
Authentication and Authorization
In this article we will learn about how to develop a spring
security framework which covers both authentication and authorization. I have
explained each step in detail along with snapshot of creating each entity. I hope
that you also get quickly Hands On Spring Security.
Tools to be used:
- Eclipse 3.5
- Spring 3.0.5
- JBoss v5.0
We will use following major libraries (refer to Libraries snapshot
for complete list of jars required both at compile time and runtime:
- Spring Core 3.0.5
- Spring Security 3.0.5
- Spring MVC 3.0.5
- Spring AOP 3.0.5
Steps to be followed:
- Create a dynamic web project in Eclipse and configure libraries.
- Create a package structure.
- Configure Spring related details in Web.xml.
- Create a spring-security.xml (can be renamed as per convenience).
- Create a mvc-dispatcher-servlet.xml (can be renamed as per convenience).
- Create a Controller class to secure methods.
- Create a welcome page with links to your Controller request mapping.
- Create an authorization/unauthorization page where user will be redirected in case of authentication success/failure respectively.
- Create a logout page where user will be redirected in case of logout.
- Create an EAR project, link with your webapp project and deploy in JBoss v5.0

Step 1: Create a dynamic web project in Eclipse and configure
libraries
In Eclipse, go to File -> New
-> Dynamic Web Project (refer snapshot below)

Enter Project Name, such asSpringSecure (refer snapshot below)
This will create a project named SpringSecure in eclipse
workspace (refer snapshot below)

To configure libraries, copy and paste following jars to your
project WEB-INF -> lib folder (refer snapshot below):

Step 2: Create a package structure
In Project Explorer frame, select
src folder, right click it, go to New -> Package and enter package name
there. Click on Finish button (refer snapshot below)

Step 3: Configure Spring related details in Web.xml
Enter details with regard to Welcome
Page, Spring MVC, Spring Context Loader and Spring Security Filter in web.xml
(refer snapshot below)

Step 4: Create a spring-security.xml
In Project Explorer frame, go to your project, right click
WEB-INF folder and create a new XML file “spring-security.xml” (refer snapshot
below). It will create a blank xml file.

Enter details in spring-security.xml regarding which URL you
want to be secured and their role authority.
Also configure the username and password for an authorized
user. Spring security by itself will match the username and password entered
during login screen with the details provided in spring-security.xml.
Following is the snapshot of spring-security.xml:

The tag <intercept-url>
indicates the URL to be secured. Like in our case, we will secure any url
having pattern “/adminUser*”.
Also list the
authorized Role for this url in access parameter.
Like in our case, a
user having role “ROLE_ADMIN” will be allowed to access a pattern having
“/adminUser*”.
The tag <user
name=”xxxxx” password=”xxxx” authorities=”xxxx”/> indicates the Spring
security framework to allow successful authentication to a user having these
details.
Like in our case, a user having username as “admin” and
password as “admin” will be successfully authenticated. Such user will have an
authority which is mentioned against “authorities” parameter.
Spring security framework will load the above user details
in an Object and will match with the details entered by a user in Login screen.
If the details get match, then only authorization is checked further otherwise
user is shown appropriate error message in Login screen.
Step 5: Create a mvc-dispatcher-servlet.xml
In Project Explorer frame, go to your project, right click
WEB-INF folder and create a new XML file “mvc-dispatcher-servlet.xml”. It will
create a blank xml file.
Enter details in “mvc-dispatcher-servlet.xml” file regarding
your base package and view resolver.
Following is the snapshot of “mvc-dispatcher-servlet.xml”
file:

Step 6: Create a Controller class to secure methods.
In Project Explorer frame, go to your project, right click
package “com.secure” and create a new
JAVA class “AdminController” (refer snapshot below)

Enter details in “AdminContoller.java” regarding request
mapping, methods body and their return parameters.
Note – We secured following two urls in spring-security.xml. Request
mapping is entered in AdminController.java for the same. This will secure
methods such as “welcomeAdminUser” and “welcomeSupportUser”.
1) “/adminUser”
2) “/supportUser”
Refer to snapshot below:

Step 7: Create a welcome page with links to your Controller request
mapping.
To request for a page with
secured URL’s, we need to create a JSP page which we will have hyperlinks to
send request to our application.
Right click “WebContent” folder in project and create a new
folder “jsp”. In this folder we will create “home.jsp”.
Following is the content to be added in “home.jsp”.

Note – We have already added “/jsp/home.jsp” in our web.xml as welcome
page.
This page will open by default when we hit our application url.
Step 8: Create an authorization/unauthorization page where user will
be redirected in case of authentication success/failure respectively
After successful authorization,
we will redirect the user to authorization.jsp and display message there.
And in case of unauthorized user,
we will redirect the user to unauthorization.jsp.
In “jsp” folder we will create “authorize.jsp” and
“unauthorize.jsp”.
Following is the content to be added in “authorize.jsp”:

Following is the content to be added in “unauthorize.jsp”:

Note – In our “AdminController.java”,
we have already added code statement to redirect to “authorize.jsp”. See
snapshot below:

Step 9: Create a logout page where user will be redirected in case
of logout
Once user has been successfully
authenticated and authorized, Spring Security framework stores the client
related information in cookies. So in order to re-login, we need to first
logout from the application.
We will create a new JSP with
name “logout.jsp”.
Following is the snapshot of
“logout.jsp”:

Note –We have already provided “Logout”
hyperlink to user in our “authorize.jsp”.
Refer snapshot below for the same:

That’s all with coding;
Spring Security framework will by itself take care of Login Page. Yes, in case
we do not specify our custom Login page, then Spring Security framework by
itself display a Login page.
Step 10: Create an
EAR project, link with your webapp project and deploy in JBoss v5.0
Go to File -> New -> Select ‘Enterprise Application
Project’ and enter EAR name like ‘SpringSecureEAR’.

Do remember to choose
‘SpringSecure’ (webapp project) as dependency when creating EAR. Click on
Finish button.
Add the newly created “SpringSecureEAR” resource on the
server (refer snapshot below)

After this click on Finish button and then start server.
To Test the Security,
we need to hit the following URL:
This will send the request to our application, and a home
page will be displayed as following:
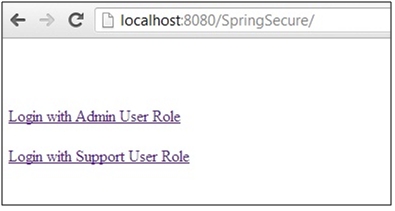
Click on first link, this will trigger
the Spring Security as request is for “/adminUser” page.
The inbuilt Login Page will be
displayed for authentication of the user. Refer to the snapshot below:

Enter User as “admin” and Password
as “admin” and Submit the page.
As we have defined a user tag
already in “spring-security.xml”, therefore authentication will be done on
basis of what we have entered in login page with the details present in xml
file.
The admin user is having a role
“ROLE_ADMIN” as already defined in user tag in spring-security.xml file. Refer
to snapshot below:
<user name="admin" password="admin"
authorities="ROLE_ADMIN" />
As authority of admin user matches
with the role needed to access “\adminUser” url, therefore it will get
successfully authorized.
An authorization page will be
displayed as per return type mentioned in our “AdminController.java”.

On click of “Logout” link, user
will be redirected to our controller. There we can build the logic to clear any
session data available, if any.

In case user is not authorized,
then following page is displayed:


